Thanks to Pacha Hornaday for contributing this guest post.
Our daughter Mathilda recently celebrated her second birthday, and since she has a lot more friends now than at the time of her first birthday, we decided to throw her an age-appropriate (i.e. messy) birthday party. It was inspired by her best friend Avi’s party, which consisted in part of 100 pounds of flour in two kiddie pools.
When planning this party, three things were important to me: Make it fun for the kids, keep it healthy, and produce as little trash as possible.
The fun factor
I decided a “frost-your-own-cupcake” party was the perfect theme. And doing it at the park would keep the clean-up factor in our house to a minimum. I made the cupcakes and set up one table with frostings and one table with toppings. The tables were at an appropriate height for the kids. Each frosting was in a separate ceramic or glass bowl, and in a cup, a bunch of bamboo butter knives were eagerly awaiting little hands. The toppings were also in glass and ceramic bowls, each with a spoon for easy topping. The cupcakes were on the higher tables, so the parents had some control over the process but on the frosting and topping tables, the kids could do whatever they wanted. They seemed to enjoy the frosting, some even more than the eating of the cupcakes. The close-by slides and swings made it possible to run off possible sugar highs and extra calories.
The food
Making cupcakes healthier than the bright-colored ones found in your local supermarket (loaded with HFCS, artificial colors, and who-knows-what) is actually pretty easy when you make them yourself. If you don’t have time, there are plenty of cupcakeries with tons of flavors and everything from vegan to gluten-free. And I’m sure you can get them unfrosted, too.
I searched my favorite food blogs for ways to hide vegetables in cupcakes and came up with three different vegan flavors: spiced carrot cake, chocolate beet and lemon kale. The kale version was supposed to be zucchini but I changed my mind last minute, and there was definitely room for improvement. Stay tuned for an update on that one. The chocolate beet ones were my favorite. Find the recipe here. I made mini cupcakes for the kids and regular-sized ones for the parents.
For frostings, I chose chocolate pudding, almond butter frosting and avocado-lemon frosting. I thought kids might be into the green avocado color, but the chocolate pudding was the definite winner on the frosting table (no surprise). So much so, that some kids would skip the cupcake altogether. Most adults thought the avocado frosting reminded them too much of guacamole and so nobody touched it. Oh well. All frostings were sweetened with stevia.
The toppings were shredded coconut, mini chocolate chips, chopped walnuts, raisins, green sprinkles (sugar dyed with vegetables) and homemade strawberry syrup.
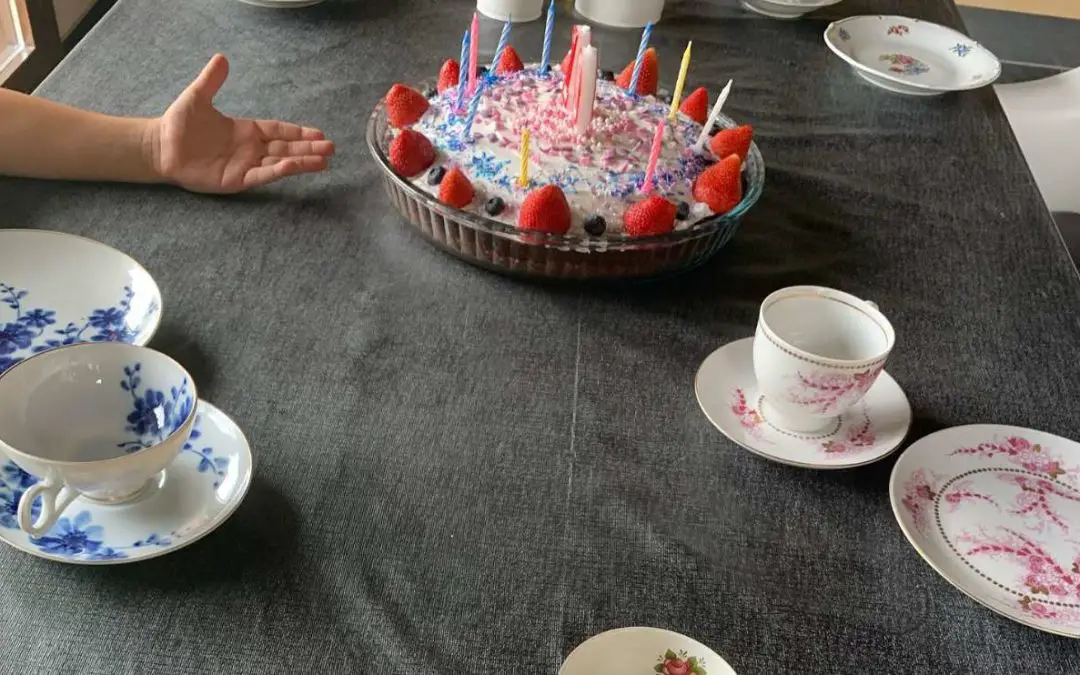
I saved one regular cupcake, frosted it and topped it with two candles to serve as our birthday cake.
We also had some fruit (watermelon, grapes, blueberries and strawberries), chips and salsa, and other snacks, as well as gummy bears and lollypops (sugar – yes, artificial colors & HFCS – no!) available.
With beverages, we tried to keep it simple. Our local supermarket had a sale going for organic Santa Cruz Lemonade so I bought a bunch of bottles for $0.99 each. I also made a lemon verbena, lavender, and mint ice tea, filled into 1/2 gallon glass jars to take to the park. There we served it from a (glass) pitcher which we filled up regularly.
Keeping it green
I must admit it was quite a challenge and I was tempted again and again to go out and just BUY the stuff everybody is used to seeing at birthday parties for kids: plastic plates and cups, single-serve beverage containers with more or less sugar/HFCS, paper napkins, balloons, etc. But I resisted the consumer temptations.
I made a bunch of napkins from fabric scraps leftover from my sewing projects. They weren’t even sewn, I just cut squares with pinking shears. We needed new napkins anyway and I finally had an excuse to make some.
Replacing the plastic or paper cups was a little trickier. We didn’t really have enough glasses, so we went through our stash of jars and picked out the most suitable ones for drinking (think wide-mouth mason jars). To remove very persistent labels soak the jar in water for a few hours and remove most of the label, then rub oil into the remaining paper and scrub it off. You might have to repeat that a couple of times. It works!
For the kids, I found 10 glass votive candle holders for $1 at a thrift store. Perfect! That way I wouldn’t be bummed if one breaks. I was thinking baby food jars would also work great. We skipped plates altogether.
We set up a cardboard box for recycling, had a bucket for dirty napkins and rags, and brought our compost bin for food scraps. You can definitely pretty that up by having matching bins or buckets. We decorated the pavilion in the park with some prayer flags that usually hang in our bedroom, and the tables with two table runners we use at home.
Green Party Favors
My original idea was to make aprons for all the kids, but in the end, I ran out of time. I ended up using another Montessori idea I had been wanting to make for a while: Placemats with outlines of the plate, glass, cutlery and napkin. Setting the table is the perfect task for two-year-olds to do when you need a few more minutes to get dinner ready. I used wipeable vinyl mats and outlined everything with a sharpie, and personalized each mat with the child’s name. I also included a bamboo plate, folk, spoon and knife, as well as a napkin (made from my fabric stash again). Millie loves her placemat and is getting pretty good at setting the table before dinner. I hope her friends get to enjoy their mats as well.
All in all, I would consider it pretty successful. Depending on your time or helping hands, you can definitely improve on the decorations (think paper or even glass lanterns, paper pom poms, etc.) and in my case on the food (namely the lemon kale cupcakes and the avocado frosting). On the trash side, we did really well. The only trash that couldn’t really be composted or recycled were the cupcake liners. And we now have a bunch of jars and napkins for our regular potlucks.
As far as the fun factor goes, it seemed like everybody had a good time, although I’m sure we’re now considered “definitely different” and we will see which ones of our party guests will show up to Mathilda’s third birthday party.
BONUS RECIPE: Chocolate Beet Cupcakes
Our household recently enjoyed a wonderful weekend filled with delicious and nutritious chocolate beet cupcakes. From the same kitchen that boasts regular batches of incredibly disappearing kale chips and notoriously mouthwatering sweet potato curry, here’s a must-try addition to your regular menu of well-balanced appetizers.
If you crave their vitamins and minerals but have a hard time turning those intensely crimson root vegetables into something irresistibly scrumptious, then here’s a formula to satisfy all your dietary needs and indulge your most decadent appetite. Looking for a way to deliver the daily requirement of hearty vegetables to your fussiest young eaters? Look no further. Just be sure your stockpile the ingredients, because when the first batch is gone, the whole house will be clamoring for more!
Ingredients:
1 cup of soy milk (we used hemp milk)
1-1/2 tsp. apple cider vinegar
1-3/4 cups whole wheat flour
1/2 cup all-purpose flour
1 tsp. baking powder
1 tsp. baking soda
5 tbsp. cocoa powder
3/4 cup + 2 tbsp. sugar (last time used 2/3 cup agave this time about the same sugarbeet syrup. Agave is sweeter than sugar so you need less in general.)
1/2 cup canola oil (we used safflower oil)
2 tbsp. molasses
1-1/2 tsp. vanilla extract
1 tsp. salt (we added salted almonds and skipped the salt.)
1/2 cup roasted chopped almonds
1/2 cup chocolate chips
2 medium red beets, raw and grated
Instructions:
In a small bowl, whisk the milk and vinegar, and then set aside to curdle.
In a large bowl, whisk the flours, baking soda and powders.
In another large bowl, whisk the sugar, oils, molasses, vanilla and salt. Add milk to this admixture once thoroughly whisked.
Add wet ingredients (large bowl #1) and dry ingredients (large bowl #2), and stir until just combined.
Add beets, chocolate chips and nuts.
Fill cupcake liners to the top and dome them slightly, for they don’t rise like regular cupcakes.
Bake at 25-30 minutes at 325º.
We baked for 30 min. at 350º, and they achieved a sumptuously hearty yet succulently moist consistency, more like muffins than cupcakes. We couldn’t eat them fast enough. That batch produced 12 regular-sized cupcakes and 8 minis. All were devoured quickly.
Pairs nicely with pistachio ice cream, sliced cantaloupe and/or White Russians.
Enjoy!
Still hungry? For more healthy recipes, check out our Kale Retrospective!